Selling at a farmers market is one of the simplest ways to start a food business. You make something people want, show up with a table and a canopy, and start selling directly to your neighbors. No retail lease. No massive startup costs. No complicated supply chain. Just you, your products, and a crowd of people who came specifically to buy from local vendors like you.
But simple does not mean easy. There are applications to fill out, booth setups to figure out, pricing decisions to make, slow days to survive, and growth decisions that can either build your business or burn you out. This farmers market vendor guide covers all of it, from your first application to expanding beyond a single market.
The short version: Selling at a farmers market costs $20 to $75 per week for a booth, requires a vendor application (sometimes months in advance), and can generate $500 to $2,000 or more per market day depending on what you sell and how you sell it. The vendors who succeed long-term set up eye-catching booths, price for profit (not just to cover costs), build a base of repeat customers, and eventually add online ordering to capture sales between market days. This guide walks you through every stage, from getting accepted to growing beyond your first market.
Yes, for most small food vendors, selling at a farmers market is worth it. The startup costs are low, the risk is manageable, and the direct feedback from customers is something you cannot get from any other sales channel.
Here is what makes it worth it:
The honest caveat: not every market is a winner. Some markets have low foot traffic, high fees, or too many vendors selling similar products. The key is choosing the right market, which starts with a strong application. For a deeper look at the numbers, check out how much you can actually make selling at farmers markets and whether selling at farmers markets is profitable with real numbers.
Most farmers markets require a vendor application, and popular markets can be competitive. Getting accepted is not random — market managers look for specific things, and you can improve your odds dramatically by understanding what they want.
Apply early. Many markets open applications three to six months before the season starts. Popular urban markets may have waitlists that fill up a year in advance. Smaller community markets are often more flexible, but even they fill up.
Market managers want vendors who will show up consistently, bring quality products, and contribute to a balanced product mix. Here is what matters most in your application:
For a complete walkthrough, read our guide on farmers market vendor application tips and learn what farmers market managers actually want in a vendor application.
Use this checklist before submitting any vendor application:
Your first market is the hardest one to get into because you have no track record. After your first season, applications get much easier. For step-by-step guidance on your entire first market experience, start with how to sell at a farmers market.
Start with a small, focused product line. New vendors who bring 15 different products to their first market almost always do worse than vendors who bring three to five products and sell them well.
The best farmers market products share a few characteristics:
Some of the most profitable foods to sell at farmers markets include baked goods, jams and preserves, hot sauce, honey, granola, and prepared foods like tamales or empanadas.
| Product Type | Margin | Volume Potential | Best For |
|---|---|---|---|
| Baked goods | 60-75% | High | Impulse buys, repeat customers |
| Jams and preserves | 65-80% | Medium | Gift shoppers, loyal regulars |
| Hot sauce and condiments | 70-85% | Medium | Unique flavors, brand building |
| Fresh produce | 40-60% | High | High-traffic, steady demand |
| Prepared foods | 55-70% | High | Lunch crowds, event markets |
| Honey | 65-80% | Medium | Premium positioning, health-conscious buyers |
Start with your strongest two or three products. Add variety once you know what sells at your specific market. For more guidance on your initial product selection, check out what to sell at your first farmers market.
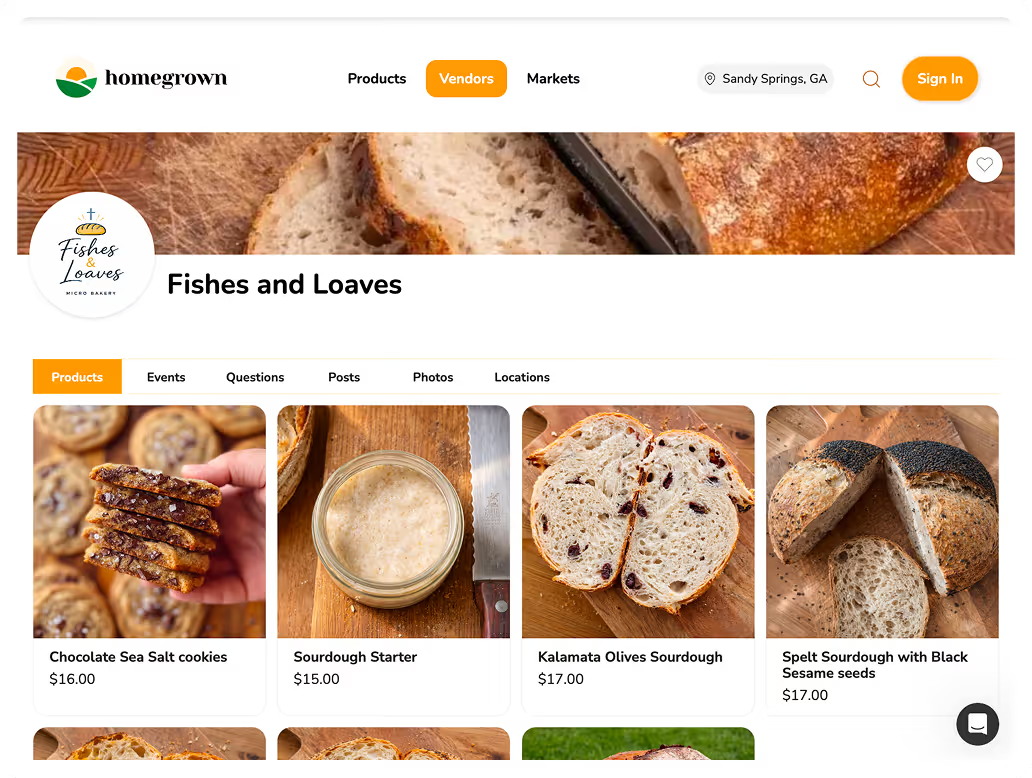
Your booth setup is your storefront, your billboard, and your first impression, all in one. Vendors with attractive, well-organized booths consistently outsell vendors with cluttered or bare setups, even when the products are similar.
Here is what you need for a professional booth setup:
For a complete packing list, read what to bring to your first farmers market.
Follow these layout principles to maximize customer engagement:
For detailed booth design ideas, browse farmers market booth setup ideas and learn how food photography can improve your market presence. If you also sell from a roadside stand, our farm stand signage guide covers the different design requirements for road-facing signs that need to be readable at 35 mph.
A QR code at your booth is one of the cheapest and most effective tools you can use. Put one on your table sign that links to your online ordering page so customers can place orders between markets. This single addition can add 10-20% to your weekly revenue without any extra market days. For a complete setup walkthrough, our guide on setting up a QR code at your farm stand covers placement, sizing, and how to generate one that links to your ordering page. See our best QR code ideas for farmers market vendors.
Most farmers market vendors earn between $200 and $2,000 per market day, with the wide range depending on your products, your market, your booth setup, and how long you have been selling.
| Vendor Type | Typical Market Day Revenue | Weekly Costs | Net Profit per Market |
|---|---|---|---|
| New vendor (first season) | $200-$500 | $80-$150 | $50-$350 |
| Established vendor (2+ years) | $500-$1,200 | $100-$200 | $300-$1,000 |
| Top vendor (popular product, great setup) | $1,000-$2,500+ | $150-$400 | $600-$2,100+ |
Your booth fee is just one of many costs. Here is what a typical market day actually costs:
Add those up, and a vendor grossing $600 in sales might take home $300 to $400 in profit. That is solid for a Saturday morning side income. One often-overlooked cost is insurance — at $25 per month, it is cheap protection that most markets require anyway.
For detailed math on making your booth investment pay off, read about farmers market booth ROI and how to calculate your farmers market break-even point. Our guide on how to price food products for a farmers market walks you through the exact formula.
New vendors make predictable mistakes. Avoiding these will put you ahead of most first-year vendors.
For a deeper dive into each of these, read our full guide on farmers market vendor mistakes and learn about vendor etiquette that keeps you in good standing.
Bad weather and slow days are part of the deal. Every vendor faces them. The vendors who last more than one season are the ones who have a plan.
Rain does not have to mean zero sales. In fact, the vendors who show up on rainy days often face less competition and find that the customers who do come are serious buyers.
For a complete rain-day strategy, read farmers market rain day tips.
Slow days happen even in good weather. Instead of standing around frustrated, use slow days productively:
Check out our full guide on handling slow days at the farmers market. And if you have the opposite problem and sell out before noon, here is what to do when you sell out early.
Once you have a successful routine at one market, the question becomes: how do you grow? There are three main paths.
Selling at multiple markets multiplies your revenue, but it also multiplies your workload. Before adding a second market, make sure you can handle the extra production, the additional setup and breakdown time, and the possibility of two back-to-back market days.
Key questions to ask before adding a market:
Read our detailed guide on whether you should do multiple farmers markets before making this decision.
This is the highest-leverage growth move most vendors can make. Online ordering lets your existing customers buy from you between market days, which means more revenue without more market days.
Here is how it works:
Vendors who add online ordering typically see a 20-40% increase in total weekly revenue. Our guide on adding pre-orders to your farm stand covers the complete setup, and the farm stand startup checklist gives you the full step-by-step if you are adding a stand to complement your market presence. Your market booth becomes the marketing engine, and your online storefront captures the sales you would otherwise miss.
The ordering platform you choose matters here because most general e-commerce tools are not designed for how market vendors actually sell.
Square Online is the natural first thought since you probably already use a Square reader at your booth. But Square Online is a full website builder — you are paying $29/month for a site with pages, menus, and features you do not need. You just want customers to see your product list, pick what they want, and pay before Saturday.
Etsy works for shelf-stable products you can ship, but most farmers market orders are local pickup. Etsy takes 6.5% plus fees on every sale, and the platform is built around shipping, not "pick up at my booth Saturday morning."
Homegrown is $10/month and built specifically for this use case. You list your products, set a cutoff day (so you know what to make by Thursday), and share the link via your QR code at the booth, your social media, and your email list. Customers order and pay ahead. You see exactly what to bring Saturday. When something sells out, it closes automatically.
Homegrown is not a full website or an e-commerce store — it will not help you build a brand page, ship products nationally, or sell wholesale to stores. It is an ordering page for local vendors who want to turn their Saturday regulars into pre-order customers during the week.
For step-by-step instructions, read how to add online ordering to your existing market business and learn how to get your market regulars to order online between markets.
Sometimes the best growth strategy is not adding more markets or channels, but doing better at the market you already have. This means:
As your business grows, you need systems to stay organized. A digital market day checklist helps you track inventory, supplies, and tasks so nothing falls through the cracks on market morning.
Here is a realistic breakdown of what it costs to get started as a farmers market vendor:
| Item | Cost Range | Notes |
|---|---|---|
| Canopy tent (10x10) | $150-$400 | Commercial grade recommended |
| Folding tables (2) | $60-$120 | 6-foot tables with tablecloths |
| Signage | $30-$100 | Banner, price signs, business name |
| Weights/anchors | $20-$60 | 25 lbs per leg minimum |
| Display supplies | $30-$80 | Crates, risers, baskets |
| Payment processing | $0-$30 | Square/Stripe reader |
| First product batch | $50-$300 | Depends on product type |
| Packaging and labels | $30-$80 | Bags, containers, stickers |
| Permits and licenses | $25-$200 | Varies by state and product |
| Total startup | $395-$1,370 | Most vendors start under $800 |
These are one-time costs (except for products and packaging, which are ongoing). Your weekly recurring costs will be your booth fee, product ingredients, and transportation. Most vendors break even within their first two to four market days.
State and local regulations vary widely. Check your state's cottage food laws and farmers market vendor requirements through your state's Department of Agriculture or local cooperative extension office for specific licensing and permit requirements.
Here is a realistic timeline for your first week as a vendor:
For a detailed packing list and first-day tips, read our guide on your first week as a farmers market vendor.
Most vendors spend between $400 and $800 to get started, covering a canopy, tables, signage, their first product batch, and basic permits. Weekly ongoing costs include your booth fee ($20 to $75), product ingredients, packaging, and transportation. This farmers market vendor guide recommends budgeting $800 for your initial setup and keeping at least four weeks of booth fees in reserve so you are not stressed if sales start slow.
Requirements vary by state and by what you sell. Most states allow home-baked goods and certain preserved foods to be sold under cottage food laws without a commercial kitchen. However, many markets require their own vendor permits, liability insurance, or food handler certifications. Check with your state's Department of Agriculture and your specific market's application requirements.
The most profitable products combine high margins, visual appeal, and repeat purchase potential. Baked goods, jams and preserves, hot sauce, honey, and prepared foods like tamales or empanadas are consistently among the top sellers. The best product for you is something you can produce consistently and affordably with a selling price that gives you at least 60% gross margins.
Consistency is the foundation. Show up every week, have the same core products available, and greet returning customers by name when possible. Beyond that, offer a weekly special or rotating seasonal product that gives regulars a reason to check in. Collecting emails or setting up an online ordering page lets you remind customers about your products between market days, which is the single most effective way to turn occasional buyers into weekly regulars. A Homegrown storefront makes this easy by letting customers order online for market-day pickup.
Apply three to six months before the market season begins. Popular markets in urban areas may have waitlists, so applying early gives you the best chance. If you miss the window for one season, apply for the next season immediately and ask to be placed on the waitlist. Smaller and newer markets are often more flexible with timing and may accept applications on a rolling basis.
Some vendors do, but most use farmers markets as a primary revenue stream supplemented by other channels. A vendor selling at two to three markets per week and grossing $1,000 to $2,000 per market can earn a full-time income. Adding online ordering between markets increases your revenue without adding more market days. The path from part-time vendor to full-time business usually takes one to two years of consistent selling and gradual growth.
Selling out early is a good problem, but it is still a problem because you are leaving revenue on the table. Increase your production for the next week, raise your prices (selling out means demand exceeds supply), and use the remaining market time to collect customer emails and promote your online ordering. Read our full guide on what to do when you sell out before noon.
You do not need to have everything figured out to start. You need a product people want, a market that will accept you, and the willingness to show up and learn. The best vendors did not start as the best vendors. They started as nervous first-timers who got a little better every week.
This farmers market vendor guide covered the big picture. Use the linked articles throughout to dive deeper into the specific topics that matter most to you right now. And when you are ready to capture sales between market days, set up a Homegrown storefront to let your customers order online for market pickup or local delivery. It takes about 15 minutes, and it is the easiest way to grow your market business without adding more market days.